 Save
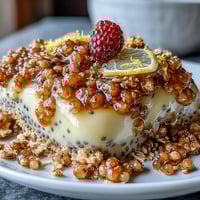
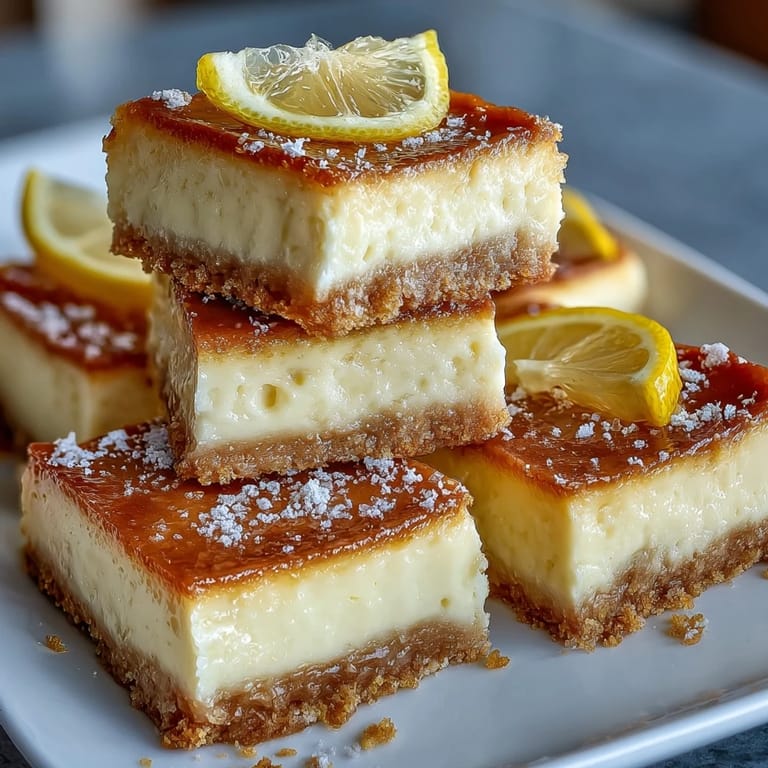
Save Last summer, I was at a friend's garden party where someone brought these limoncello cheesecake bars, and I watched grown adults actually fight over the last piece. There's something about that combination of buttery crust, creamy filling, and bright citrus that just stops people mid-conversation. I went home determined to crack the recipe, and after a few attempts, I realized the secret was respecting the chilling time and not overthinking the filling. Now these bars show up at every summer gathering I host, and honestly, they've become my secret weapon for impressing people who think they don't like desserts.
I made these for my neighbor's 40th birthday party on a sweltering July afternoon, and I remember standing in my kitchen with all the windows open, zesting lemons until my fingertips were yellow. My kid wandered in asking what smelled so good, and we ended up doing a little taste test when they came out of the oven. The moment those bars hit the dessert table, people started abandoning their main courses—that's when I knew I'd created something special.
Ingredients
- Graham cracker crumbs: Use the finely crushed kind if you can find them, as large chunks won't pack down properly and your crust won't have that satisfying crunch.
- Unsalted butter: This lets the lemon shine without competition, so don't use salted butter as a shortcut.
- Cream cheese: Room temperature is non-negotiable here—cold cream cheese will give you lumps that no amount of beating can fix, and I learned that the hard way.
- Limoncello: Quality matters, but you don't need the expensive stuff; mid-range works beautifully and won't break the bank.
- Lemon zest: Use a microplane zester if you have one—it gives you fluffy, flavorful zest instead of those tough little strings from a box grater.
- Sour cream: This is your secret weapon for tanginess; it prevents the cheesecake from being one-note sweet and adds moisture.
- Eggs: Add them one at a time and scrape the bowl between each one, or you'll end up with streaks of egg white in your filling.
Instructions
- Prep Your Pan:
- Line an 8x8-inch pan with parchment paper, letting the edges overhang like you're tucking a baby into bed. This makes pulling out your finished bars feel like magic instead of a wrestling match.
- Build the Foundation:
- Toss graham cracker crumbs with melted butter, sugar, and lemon zest until it looks like wet sand, then press it firmly into the pan like you mean it. Bake for 10 minutes just to set it, which prevents a soggy crust when the filling goes on top.
- Cream the Cheese:
- Beat softened cream cheese for a full 2 minutes—this creates air pockets that keep your cheesecake from being dense and heavy. Once it's light and fluffy, add sugar and beat again until you can't see any grittiness.
- Introduce the Eggs:
- Add eggs one at a time, beating after each addition and scraping down the bowl; this ensures even incorporation and prevents overmixing later when you add the wet ingredients.
- Fold in the Flavor:
- Pour in limoncello, sour cream, lemon juice, vanilla, and zest, then gently mix just until combined—you want to stop the moment you don't see any white streaks. Overmixing introduces too much air and can cause cracks.
- The Final Bake:
- Pour filling over the crust and smooth the top, then bake at 325°F for 35-38 minutes until the center jiggles ever so slightly when you nudge the pan. You want it just barely set, not firm, because it will continue cooking slightly as it cools.
- Chill Like You Mean It:
- Let it cool completely, then refrigerate for at least 3 hours (overnight is better) so the flavors meld and the bars cut cleanly without crumbling or falling apart.
 Save
Save These bars somehow became the thing my sister specifically requests for her birthday every year, which is funny because she's not even a dessert person. There's something about them that transcends the typical "cake or cookies" debate—they're elegant enough for a formal dinner, casual enough for a picnic, and they somehow taste even better the next day when all the flavors have gotten to know each other.
The Limoncello Magic
The limoncello isn't just about adding flavor—it's about creating a feeling. That bright, almost floral quality of the liqueur combined with fresh lemon zest creates this lifted sensation that makes people sit up straighter and take another bite. I've learned that the limoncello needs the balance of sour cream and fresh lemon juice to shine; too much sweetness and it gets cloying, but with the right ratio, it tastes like you're eating dessert on a sunny Italian terrace.
Crust Considerations
The crust is where beginners often falter, either pressing too gently so it stays crumbly or packing it so tight it becomes dense and hard to bite through. I've found that the sweet spot is using the bottom of a measuring cup to press firmly but not aggressively, creating an even surface that's compact enough to hold together but still has that pleasant crunch. The lemon zest in the crust is subtle but important—it prevents the buttery part from overwhelming the delicate filling above it.
Storage and Serving Suggestions
These bars keep beautifully in the fridge for up to 5 days, which makes them perfect for making ahead of parties or having around for impromptu desserts. The flavor actually develops and deepens on day two, so don't stress if you can't serve them immediately. They're also lovely chilled from the fridge but not quite as good at room temperature, so keep them cold until you're ready to eat them.
- Pair with a small glass of chilled limoncello for an elegant dessert course that feels like a celebration.
- A light Moscato or even sparkling water with lemon brings out the citrus notes beautifully.
- Dust with powdered sugar right before serving for a bakery-quality finish that guests will think means you're secretly a professional pastry chef.
 Save
Save These bars have become more than just a recipe in my kitchen—they're a tradition that brings people together and somehow makes ordinary moments feel a little more special. Every time I make them, I'm reminded that the best desserts are the ones that make someone's whole face light up.
Kitchen Q&A
- → How to ensure the crust stays firm?
Press the graham cracker mixture firmly into the pan and bake it before adding the filling to create a sturdy base that holds well.
- → Can I use gluten-free graham crackers?
Yes, substituting gluten-free graham crackers and flour works well to make the bars gluten-free without altering flavor significantly.
- → What’s the best way to avoid cracks in the filling?
Avoid overmixing and baking just until the center is set; chilling thoroughly also helps the filling retain smoothness without cracks.
- → How long should these bars chill?
Chill for at least 3 hours or overnight to allow the filling to firm up and develop its creamy texture.
- → What garnishes complement these bars?
Light dusting of powdered sugar, lemon zest, or candied lemon slices enhances both appearance and flavor with fresh citrus notes.
- → Can these bars be stored for several days?
Store in an airtight container in the refrigerator for up to 5 days to maintain freshness and texture.