 Save
Save The scent of sesame and baking rice drifting from my kitchen one rainy afternoon completely changed my opinion of sushi at home. Between the gentle crackle from the oven and the pure fun of shaping nori into muffin tin cups, these little bakes always bring unexpected joy. I once stumbled into making these on a crowded weeknight when dinner needed to be fast, somewhat healthy, and a touch special—surprisingly, they checked every box. There’s something uplifting about pulling out a tray of bite-sized, golden-topped cups and watching everyone’s curiosity spark. The first time, I barely made it to the table before half were devoured straight from the pan.
On a recent Sunday, my neighbor popped by just as I was molding rice into nori cups, and her two kids declared these magical cupcakes. We ended up lingering around the kitchen island, crunching into warm, savory bites and trading stories until the last crumb of panko was gone. Sharing these on a whim like that always reminds me how food, especially in these hand-pressed forms, becomes a kind of invitation for conversation. There’s something about peeling away the crispy nori edges that makes everyone loosen up. Even the quietest guest had seconds and asked for the recipe scribbled on a sticky note.
Ingredients
- Cooked sushi rice: Warm, sticky rice holds these cups together—mixing it with rice vinegar and sugar gives the base just the right tang and shine.
- Rice vinegar: Use mild, unseasoned rice vinegar to brighten up the rice with a gentle acidity that keeps things lively.
- Sugar: A little bit draws out the subtle sweetness in rice, just like at your favorite sushi spot, so don’t skip or overdo it.
- Salt: Enhances every layer and balances the vinegar’s bite; I always taste as I mix.
- Tuna (canned in water): After draining well, it takes on flavors easily—be gentle so it stays chunky and moist.
- Mayonnaise (Kewpie preferred): The creaminess ties everything together, and Kewpie makes the mix especially luscious—regular mayo works in a pinch but miss that umami kick.
- Sriracha (optional): Use as much or as little for spice; I learned a little drizzle goes a long way with the kids.
- Soy sauce: Just a splash deepens the tuna flavor without overpowering it—go light and taste before adding more.
- Green onions: Chopping them fine gives each bite a fresh zing—save a few for garnish if you’re feeling fancy.
- Roasted nori sheets: Cut neatly, they become perfectly crisp-edged cups after baking; be sure they’re pliable, not brittle.
- Shredded mozzarella cheese: Melts over the tops to create a bubbly, irresistible crust—don’t overdo or it’ll overwhelm the other flavors.
- Japanese-style panko breadcrumbs: These give crunchy contrast on top; I’ve learned to toast mine a minute for extra golden color.
- Sesame seeds: Sprinkled just before serving, they add a nutty aroma that instantly makes things more festive.
- Optional garnishes (avocado, extra sriracha, sliced green onions): They turn these cups from simple snacks into craveable appetizers every time.
Tired of Takeout? 🥡
Get 10 meals you can make faster than delivery arrives. Seriously.
One email. No spam. Unsubscribe anytime.
Instructions
- Prep & warm the oven:
- Preheat your oven to 375°F (190°C) and lightly grease a 12-cup muffin tin; you’ll hear it sizzle softly when you press in the nori.
- Season the rice:
- Mix the warm, cooked sushi rice with rice vinegar, sugar, and salt until glossy—use a cutting motion like Japanese chefs do for best texture.
- Press your nori cups:
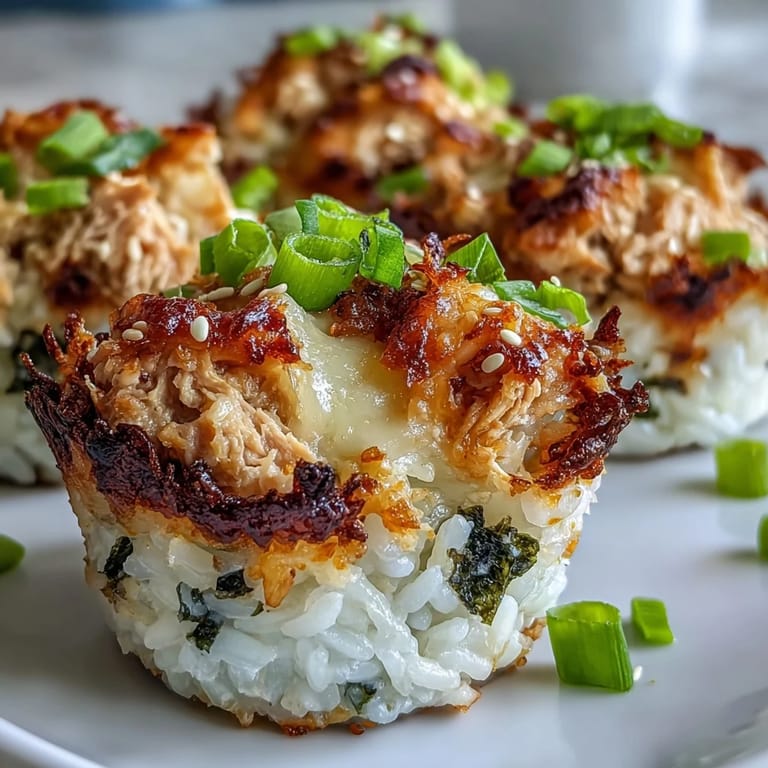
- Line each muffin cup with a cut sheet of roasted nori, molding gently so it hugs the base and sides like a little basket.
- Fill with rice:
- Divide the seasoned rice evenly, gently pressing down so it sticks in place but keeping the rice fluffy not packed too tight.
- Mix the tuna filling:
- Combine drained tuna, Kewpie mayo, sriracha (if using), soy sauce, and green onions in a bowl—fold together until creamy but not mushy.
- Spoon in the tuna:
- Add a generous scoop of the tuna mix over the rice in each cup, evening out the layer with a spoon; don’t skimp.
- Top with cheese and breadcrumbs:
- Sprinkle each cup with mozzarella and a shower of panko; these melt and crisp up for that signature finish.
- Bake:
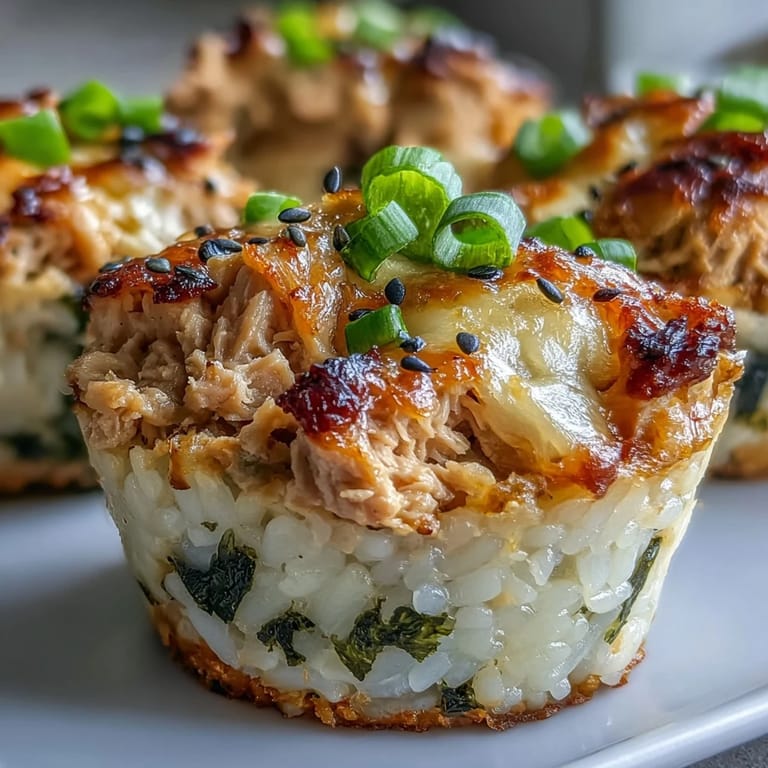
- Slide the tin in the oven and bake 15–20 minutes, or until golden and bubbling and the nori edges look just crisp.
- Cool & lift out:
- Let the cups rest in the pan 5 minutes so they set, then gently lift out with a spatula—they should come out clean if the nori was pressed well.
- Garnish & serve:
- Top with sesame seeds, slices of avocado, swirls of spicy mayo, or snips of green onion; enjoy warm for the perfect balance of textures.
 Save
Save A friend once confessed that her whole family cheers when she brings out these sushi bake cups, treating them like edible little presents at the table. There’s something about seeing hands reach for seconds that tells you you’ve created a minor kitchen miracle.
Making It Your Own
The base recipe loves bold swaps—sometimes I use flaked salmon or leftover rotisserie chicken, and every time they vanish just as fast. There’s no shame in playing with the toppings, too: sesames seeds and a squeeze of citrus brighten things up, and when I tried crumbled seaweed snacks in place of plain nori, the extra crunch was a hit. Once, I even made a kid-friendly batch with mashed chickpeas that disappeared before the adults noticed. These cups are forgiving, beginner-friendly, and always open to interpretation. Trust your taste buds and see where improvising leads you.
Serving Suggestions You Should Try
Sushi bake cups have a sneaky way of turning even casual gatherings into mini celebrations. For a fuller experience, I set out bowls of soy sauce, wasabi and pickled ginger and watch guests invent their own perfect bites. Pair with a simple miso soup and a salad if you want to make them the star of a weeknight dinner. If you’re packing for lunch, slip some sliced cucumber or radish alongside for extra crunch. They hold up surprisingly well at room temperature; just keep garnishes separate for best texture.
Kitchen Lessons (Some Learned the Hard Way)
The best surprise is how quickly you fall into a groove while making these, but a few moments stick with me: my first batch fell apart because I packed the rice too loosely; by the third, my fingers knew just how firmly to press. If you’re making a big batch, work in sets, not all at once, so nothing sits too long before baking—crispy nori is the secret to the perfect bite. And don’t be shy with panko; more crunch always wins!
- Layer the cheese lightly for a savory seal without gooey overload.
- Swap mayonnaise for vegan mayo to make these dairy- and egg-free with no flavor lost.
- Handle the nori swiftly—humidity in the kitchen can make it limp if left out while prepping.
 Save
Save I hope these sushi bake cups bring your kitchen as much laughter, messiness, and surprise delight as they’ve brought mine. Don’t expect leftovers—they’re almost too easy to eat.
Kitchen Q&A
- → Can I use fresh tuna instead of canned?
Yes, fresh tuna can be cooked and flaked before mixing with the other ingredients, though canned tuna offers convenience and consistent flavor.
- → What is the best way to press the rice into the cups?
Use a small spoon or your fingers to gently press the seasoned sushi rice evenly into each nori-lined muffin cup, ensuring it packs well without crushing the grains.
- → Can I omit cheese for a dairy-free version?
Absolutely, simply leave out the mozzarella and consider adding extra panko for crunch or a drizzle of spicy mayo for flavor.
- → How spicy are the bake cups with sriracha?
The sriracha adds a mild to moderate heat that can be adjusted or omitted according to preference.
- → Are these bake cups suitable for meal prep?
Yes, they reheat well and keep their texture when stored in an airtight container for up to 3 days in the refrigerator.
- → What can I serve alongside these cups?
Complement these cups with pickled ginger, soy sauce, or wasabi for an enhanced flavor experience reminiscent of classic sushi accompaniments.